


Vinyl floor tiles provide a durable and easy-to-install surface that can replicate the appearance of natural materials, making them particularly suitable for education projects. This CPD module is sponsored by Karndean Designflooring
How to take this module
![]()
To take this module read the technical article below and click through to a multiple-choice questionnaire, once taken you will receive your results and if you successfully pass you will be issued automatically with a certificate to print for your records.
![]()
Vinyl floor tiles are manufactured from a number of layers of PVC, plasticisers and stabilisers, which together create a highly durable flooring surface. This presents an alternative to carpet, sheet vinyl and laminate flooring products, as well as natural flooring materials. Vinyl floor tiles are particularly suitable for use on education projects because they are less expensive than popular natural materials such as stone and wood, but can be designed to replicate their appearance.
Benefits of vinyl floor tiles
Appearance
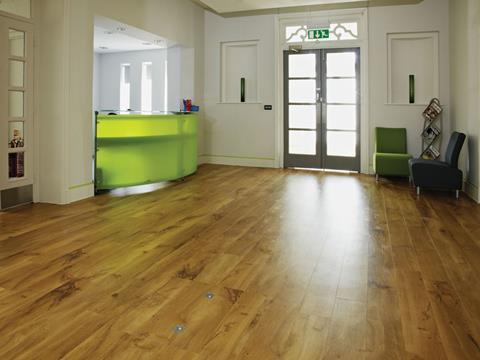
Wood and natural stone are often specified in education environments because they provide a warm, natural feel. There is an increasing number of vinyl floor tiling products that can emulate the appearance of wood and stone.
The manufacturing process begins with a real-life sample, perhaps sourced from a forest or a quarry. A photo-real replica image is created that shows the creases, cracks, knots and any colour changes. This is added beneath the transparent upper wear layer of the tile (see “Manufacture” below), after which an authentic texture can be applied: wood ranges can be either hand-carved or hand-scraped to pick out the knots in planks, for example.
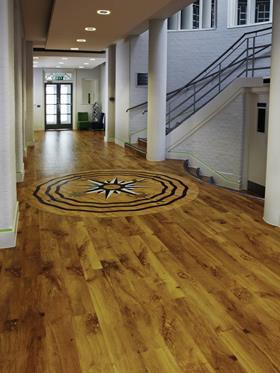
In addition, a variety of designs can be incorporated into vinyl installations, including logos and emblems — a recent project completed by Karndean Designflooring at Bedford Girls School included an inlaid compass logo at the bottom of the stairwell.
Speed of installation
In educational environments, there is often only a small window in which to carry out large-scale maintenance or refurbishment work. Choosing vinyl floor tiles, as opposed to ceramic tiles or wood flooring, can save time. For example, ceramic tiles and real wood planks are thicker than vinyl flooring, which means that the installer may have to adjust doors, cupboards or pipe work before fitting these products.
Thermal & acoustic benefits
Vinyl flooring applications can be used to build in better heat insulation, if fitted on top of a cold stone floor, where a sub-floor preparation system can create a layer of insulation between the base and final floor covering. They can also help reduce noise in busy areas, delivering an impact sound reduction of up to 21dB.
Durability
Vinyl floor tiles can last for many years, depending on the depth of the wear layer. Karndean Designflooring recommends wear layers of between 0.55mm and 0.7mm for areas of heavy traffic.
Manufacture of vinyl floor tiles
The components of Karndean Designflooring’s Luxury Vinyl Tiles product are as follows:
- Base layer Designed to bond with adhesive and adhere to the subfloor.
- Middle layer The core of the tile, providing strength and stability.
- Photographic film The image that you actually see, a photograph of a natural product.
- Wear layer A hard-wearing but transparent layer embossed with a texture for grip and to enhance the visual effect. The thickness of this layer determines the performance of the floor. Generally, a rougher wear layer will increase the slip resistance.
- Polyurethane coating A thin coating applied during manufacture that seals the product and adds durability. This means there is no need to seal the product after installation, saving time and money.
- The raw materials of vinyl floor tiles are as follows:
- Plasticisers To make the material more flexible.
- Stabilisers To prevent the material from degrading.
- Fillers To bulk out the backing and middle layers to provide rigidity.
- Salt The main ingredient of PVC.
- Recycled plastic (PVC) Closed-loop recycling means that any manufacturing waste goes back into the system.
- Photographic film Onto which the design is printed to give the product a realistic appearance.
- Polyurethane coating Applied and fixed using ultraviolet light to keep the product in good condition and help prevent scratching.
To create each layer, PVC, plasticisers and stabilisers are blended together in an industrial mixer. This molten material is then exposed to heat and pressure and passed through a series of rollers to produce flat sheets of material. This is a process known as “calendering”.
The sheets are then laminated together to produce one sheet. During this process, the surface texture is applied to the top layer, using specially manufactured cylinders with metal plates to emboss the pattern onto the sheet.
The sheet then undergoes “annealing”, which removes internal stresses through controlled heating and cooling. This ensures the product is dimensionally stable. The product is then cut into tiles, strips or designs and packaged for sale.
Installation of vinyl floor tiles
Before installing vinyl floor tiles, it is important to prepare the sub-floor to ensure that the surface is dry and even. Karndean Designflooring recommends that its products are only laid on sub-floors where the moisture content level does not exceed 75%RH when tested with a hygrometer in accordance with BS8203-4:2001 (Installation of Resilient Floor Coverings). Where readings above 75%RH are recorded, it would be necessary to install a surface damp-proof membrane (DPM).
For readings below 75%RH, the next step depends on the sub-flooring material:
- New concrete floors should be cleaned and dried to remove any contamination — such as paint or plaster — before priming with neoprene or PVA primer.
- Power-floated concrete floors require abrasion, either by scarification or light shot blasting.
- Existing coverings, such as quarry tiles, mosaic, terrazzo or ceramics, should be degreased and abraded.
- Asphalt should be degreased, then primed with neat neoprene or epoxy primer.
When dry, the next step for all these surfaces is to apply a 3mm-minimum layer of smoothing underlayment.
Timber requires a different treatment. For example, tongue and groove floorboards should be well secured and any loose, worn or broken boards replaced. Any undulations should then
be filled with a suitable smoothing compound before overlaying with 6mm ply fastened at 150mm centres and a feathered finish applied. Individual manufacturers should offer specific advice about how to deal with other variants, such as chipboard, MDF, plywood and laminate floor coverings.
Another important step is to ensure correct acclimatisation of the vinyl flooring before installation. Karndean Designflooring recommends removing the tiles from their packaging and allowing them to condition (on location) at a constant temperature of 18-26ºC for 24 hours prior to installation. Ideally, this temperature should also be maintained during installation and for 24 hours afterwards.
Safety
The Building Regulations Part M requires that floors are “slip resistant”, and flooring in education environments requires a particularly high slip-resistance rating to deal with the hustle
and bustle of school life. There are two common methods of slip testing — ramp testing and pendulum testing:
Pendulum testing
This is the method of testing preferred by the Health & Safety Executive for the assessment of floor slipperiness in dry and contaminated conditions. The test uses a mechanical simulator to recreate the action of a person slipping. The imitation heel replicates a standard rubber shoe sole and, when swung across the test surface, gives a measurable skid distance. This then converted into a Pendulum Test Value (PTV). The following table shows how a PTV relates to the chance of slipping:
| Risk, in 1: | PTV | Slip potential |
|---|---|---|
| 1,000,000 | 36+ | Low |
| 100,000 | 34 | Moderate |
| 10,000 | 29 | Moderate |
| 200 | 27 | Moderate |
| 20 | 24 | High |
Ramp testing
This test is widely accepted in Continental Europe and the UK. It uses human test participants to demonstrate slip potential. The flooring is secured to a hinged ramp, which is raised slowly through 29 degrees until the participant slips off. A rating is awarded according to the angle reached before the tester slipped. Ratings range from R9 to R13. R9, the first rating, means the subject slipped when the ramp was between six and 10 degrees, while R13, the highest, means the ramp reached 35 degrees with no slippage at all.
In the US, the ramp test is called the “friction test” and in Europe it is known as DIN 51130 or the “DIN test”. For a comprehensive indication of how non-slip a material is, the test is conducted when the flooring is both dry and wet.
Maintenance
Vinyl tiles offer many maintenance advantages over traditional floors. The polyurethane layer can be cleaned with 100% biodegradable surfactants. Proprietary protection systems can provide barriers against scuff marks and fine scratches.
To take this module read the technical article below and click through to a multiple-choice questionnaire, once taken you will receive your results and if you successfully pass you will be issued automatically with a certificate to print for your records.
![]()
Postscript
Privacy policy
Information you supply to UBM Information Ltd may be used for publication and also to provide you with information about our products or services in the form of direct marketing by email, telephone, fax or post. Information may also be made available to third parties. “UBM Information Ltd” may send updates about BD CPD and other relevant UBM products and services. By providing your email address you consent to being contacted by email by “UBM Information Ltd” or other third parties. If at any time you no longer wish to receive anything from UBM Information Ltd or to have your data made available to third parties, please write to the Data Protection Coordinator, UBM Information Ltd, FREEPOST LON 15637, Tonbridge, TN9 1BR, Freephone 0800 279 0357 or email ubmidpa@ubm.com.


No comments yet